As I discussed in a previous blog, effective application of the Zone System (ZS) really requires the use of a reliable hand-held spot meter. There are basically two kinds of spot meters, those with analog dials for calculating exposure and those with digital displays. While both can afford effective results, the ones with analog dials make it FAR easier to evaluate exposure (and development, with film) than meters with LCD read-outs.
It is important to keep in mind that light meters (computer-evaluative meters in modern cameras are unpredictable) are designed to yield an exposure to render the metered area middle gray (Zone V). If the subject is light, you need to MAKE it light by giving more exposure than the meter suggests. This is called PLACING the subject on a higher Zone. Dark subjects are just the opposite.
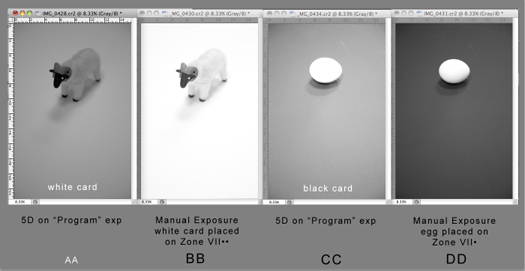
In the illustration above, figures AA and CC were made automatically using the built-in meter in a Canon 5D MkII. The camera was set on Program Exposure and the meter set on Averaging. The background in figures AA and BB was a white card, and the egg in figures CC and DD was on a black card. Left to it’s own devices, the camera assumed the subjects were both gray and rendered them that way. Using Manual Exposure, I took a reading on the white card, PLACED it on Zone VII-2/3 knowing from my test (previous blog) that the card would then be rendered near-white, and the figurine would retain excellent detail. With the egg on the black card, my intent was to keep the egg from being overexposed, so I took a reading on the top of the egg and PLACED it on Zone VII-1/3, so I would be assured of recording some texture in the shell.
I have three spot meters: two Pentax Digital meters (these have analog dials) and a MeteredLight Pocket Spot. All three meters are matched to each other, so it doesn’t matter which I use.
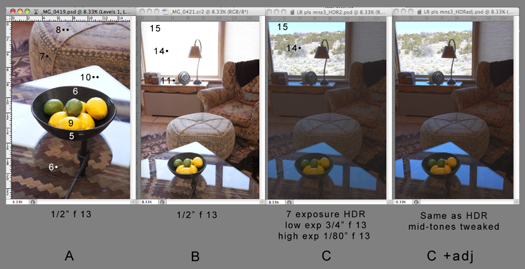
The illustration above shows how a meter can help plan how to deal with subjects ranging from easy to extreme.
Figure A on the left shows a simple still-life with the spot reading’s EV values ranging from 10-2/3 on the brightest part of the glass, to 5 on the front face of the bowl. Just a bit under six stops range, and this fits my camera’s dynamic range almost perfectly.
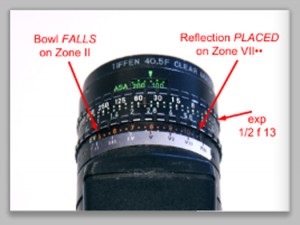
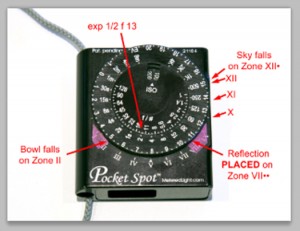
Because I wanted to make sure the highlights were not burned out, I took the 10•• reading for the reflection and placed it just less than Zone VIII. Here is where I let the meter do the work for me. At a glance I can see my Exposure Index, an array of equivalent exposure settings, and how EV values fit in the scale from dark to light. This meter has a “window” that shows three stops above and below middle gray, so I can see the range from Zone II at the left and Zone VIII on the right. I turned the EV ring until the 10•• was positioned a bit below the Zone VIII extreme. All I had to do now was choose the particular exposure combo the meter rings displayed. On the top of the barrel I could see that one option would be 1/30 at f 3.2, but my lens wasn’t that fast, and I wanted more depth of field anyway, so following the exposures around the right side of the barrel, I could see that an equivalent exposure was ½” at f 13. Click!
Next I decided to work with a broader composition, so used a wider focal length to include a window scene along with the fruit. Figure B. The light had not changed, so using the same exposure as before, the tonalities of the bowl of fruit and surrounded areas recorded the same, but the window was completely blown out. The only way to deal with a scene like this is to use HDR techniques: make a number of exposures holding detail in the shadows and on up to the brightest high tones, then use a computer program to combine them. The ZS and a spot meter can take the guess work out of this, too.
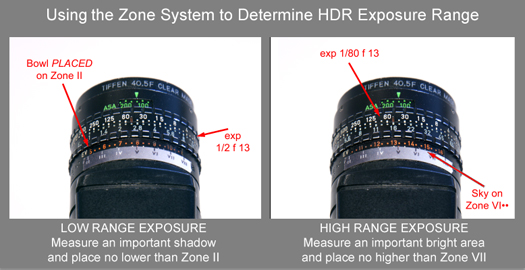
Taking a reading on the front of the dark bowl, it still reads EV 5, so if I place that on Zone II I know it will have tonality. I see that an exposure to hold the shadows is still ½ at F 13. I now measured the brightest value outside the window and note that the sky measured EV 15. I want the sky to render well below near-white, so I’ll take that EV 15 and turn the EV ring so the 15 is placed just below Zone VII. I don’t want to change my f-stop, so I see that 1/80” will safely hold tonality in the sky.
So, a series of exposures ranging at least from ½” to 1/80” will hold all the tones in this extreme scene. Assembled in Photoshop CS5, the full range is held, figure C. This looks a bit dull because of the compression of such a wide range of tones, so figure D shows the combo with the mid-tones brightened up a bit.
Sadly, Pentax seems to no longer be making spot meters, though they can often be found on-line. So far as I know, the only spot meter still being made with an analog dial is the Metered Light Pocket Spot.( http://meteredlight.blogspot.com/ ) It is only 2×2-1/4” in size and has a ZS-ready dial, engraved from Zone I to Zone X. For the illustration, I put a couple of pieces of magenta tape over the scale, leaving a “window” equivalent to the scale of the Canon 5D.
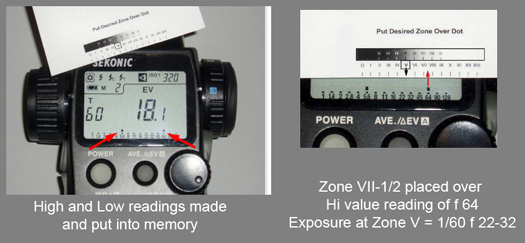
I have had a lot of students with the do-everything Sekonic meter pictured above. It is a great meter, but a bit awkward to easily use the ZS. I made a simple little accessory card that makes it a lot easier to evaluate Zone placement and exposure. The example above shows a shadow exposure of 1/60 at f 5.6, and a highlight exposure of 1/60 at f 64. If I want to place the highlight on Zone VII-1/2, I put the VII-VIII on the card over the f64 mark and see that the reading under the Zone V on the card is f22-23, so that’s my exposure at 1/60”! I also see that my shadow now falls between Zone O and Zone I, so that area and subjects up to a stop or so brighter will not be recorded.
Bottom line. There are many reasons to avail yourself of the automated features in today’s sophisticated cameras. Computerized metering modes can work wonders in fast-changing lighting situations or if your subject is evenly lit and the sun is behind your shoulders. Autofocus can save the day with moving subjects, and auto-bracketing can help explore the nuance of exposure shifts. But if your camera is on a tripod or if you have a moment to reflect upon your subject, you may well find that with just a few seconds spent with spot meter and thought will give you more successful first-exposures than letting the camera make the decisions. It’s a snap!
P.S. In black-and-white, the “extreme” scene discussed above could be easily recorded with one exposure, on negative film. ;>)

Jarrod H