Can the Zone System Go Digital?
IN A WORD…YES!
The Zone System (ZS) can be an integral and important part of any digital photographer’s workflow because it allows you to plan and predict an image’s tonal values rather than letting the camera make the decision.
The computerized metering systems in modern cameras are really amazing, and a lot of the time they will give you practical exposures, but in difficult or extreme lighting situations, the scale of the subject’s brightness is simply greater than the camera’s technology can handle.
The Zone System:
Lets you be aware of whether, or how much, the scene brightness exceeds your camera’s limits.
Lets you make an intelligent decision about how to expose when the tones/contrast in a scene are “bigger” than what your camera can capture.
Helps you avoid blown-out highlights.
Lets you know how much exposure range you need for successful HDR captures.
[spacer height=”20px”]
The Zone System 101
To use the Zone System effectively in the digital world, you need to understand a few of its basic principles.
The ZS was originally conceived by Ansel Adams and fellow photo instructor Fred Archer as a tool to give photographers working with black-and-white negative film (no digital back then!) the ability to plan and control the effects of exposure and development. They created a “scale” of tones from black to white and assigned each one a number, with “I” being almost pure black and “IX” or “X” being nearly white or white. Zone “V” is middle gray, and each “Zone” is one stop lighter or darker than its neighbor.
In the digital age, image contrast can be easily increased post-capture, but there is no practical means of reducing image contrast in a single capture. Pre-exposure can enhance shadow tonality, but this requires the ability to double-expose, and High Dynamic Range techniques (HDR) require three or more exposures for best results. And while HDR techniques can accommodate a wide range of brightnesses, the end effect often appears contrived and unreal.
Sophisticated “evaluative” metering modes in modern cameras can handle many complicated shooting situations, but if the contrast of the scene exceeds the recording scale of the camera, something’s gotta give. This is where the ZS can help.
[spacer height=”20px”]
The Zone System Step 1:
Do you need a reliable hand-held spot meter? A 1° measuring spot lets you measure important areas precisely and with ease. Using a camera’s “spot” metering mode is not always practical: the size of the spot depends on the focal length of the lens and generally requires a lot of button-pushing and pointing the camera this way and that – an exercise in frustration and wasted time.
Without a spot meter, you may know that you will lose tonality at one end of the scale or the other, but you have no way of knowing which, or by how much, at least until examining an after-the-fact histogram. By then, your scene might be gone!
That said, if a spot-meter is just not going to be in your bag of gear, you can do the test below by filling your metering area with the gray card only, and proceed as if that were a spot reading. You will at least be able to determine your dynamic range.
[spacer height=”20px”]
The Zone System Step 2:
Spot Meters and the Zone System. By design, all light meters will give you an exposure to make the measured area middle gray. This gray is called Zone V. If you measure snow in sun, the meter will give you the exposure to make the snow Zone V gray. If you measure a black speaker grille, it will give you the exposure to make that grille Zone V gray. If you want the snow to look white (not paper white but a very light gray) you need to PLACE it on a higher Zone. If you give one stop more than the meter says, you are placing the snow on Zone VI, two stops more than the basic meter reading places that value on Zone VII, and so on. As for the speaker grille, it is just the opposite. You would need to expose the grille two or three stops LESS than indicated in order to make it look dark. This would PLACE the grille on Zone III or II respectively.
You can only PLACE one value. Everything else, then, FALLS in natural relation to the placed value. A Spot Meter just makes it possible to measure small areas such as a small highlight or important dark value.
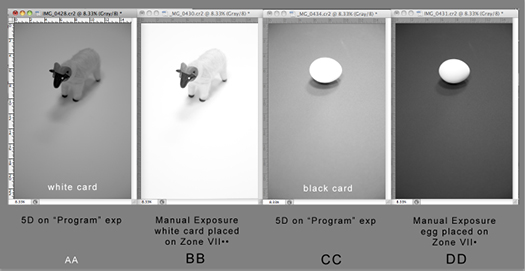
The following illustration was made using a Canon 5D MkII digital camera. The first and third images were made with the camera set on Program, letting the camera evaluate the white figurine on a white card and an egg on a black card. The sophisticated computer-based metering system assumed everything it was looking at was gray, and rendered it as gray in the capture. In the second and fourth images, I used a Pentax 1° digital (readout) spot meter and placed the white card in the second image and the egg in the fourth image just brighter than Zone VII, rendering them as near-white. No guesswork.
[spacer height=”20px”]
 [spacer height=”20px”]
The Zone System Step 3:
Know your limits. In order to plan a ZS approach to exposure, you need to know what tonal range your camera can and can’t handle. The composite image below shows nine images made with the Canon 5D set on MANUAL exposure. The target was a Kodak Gray Card with white and black patches that I made many years ago for testing the tonal range of slide film. I set my Pentax Digital Spot Meter to the same ISO as the camera, took a reading of the gray card and exposed according to the meter (a Zone V middle gray). I made four darker exposures one stop (Zone) apart and four lighter one stop apart.
[spacer height=”20px”]
 [spacer height=”20px”]
At three stops under the Zone V exposure, I had made the gray card almost as dark as the black patch, so that told me the camera could hold some tonality for a subject on Zone II. On the bright end, the gray at two stops brighter than Zone V was still a noticeable light gray compared to the white patch, but at three stops (Zone VIII) the gray had turned as white as the white patch. That told me that my upper limit for recording highlight tonality is about Zone VII-1/2, or five and a half stops total range.
[spacer height=”20px”]
The Zone System Step 4:
Measure your subject highlights. In general, with digital (and color transparency film), images look their best when the highlights are not blown out. If a photo opportunity is fleeting or moving, and I only have one chance for a shot, I will take a quick spot reading of an important high value, maybe a white dress or bright cloud, and give it an exposure of about 2-1/2 stops brighter than the basic meter reading (Zone V). This PLACES that dress on Zone VII-1/2. Having already done the test above, I KNOW that it will be very bright, but not “blown out”!
With digital, there is nothing evil about some subtle bracketing, so if you have the opportunity, go ahead and give some + and – exposures. With some practice and your spot meter, though, you’ll be surprised how often you get it right the first time! You might not need step five!
[spacer height=”20px”]
The Zone System Step 5:
Measure your subject range: If you suspect the range of brightness in the scene is significantly beyond the range of your camera, AND you have the opportunity to make multiple exposures of a stationary subject, you can use HDR techniques. The ZS can be a big help here, too. Rather than making random plus-and-minus exposures to cover subject brightness (dynamic range), you can quickly measure exactly how much range you need to cover.
Let’s say I have a tree in the foreground in deep shade with some textured charring on its trunk. In the same composition I have bright sun glaring off some pale boulders.
With just two spot readings I can determine the range and how to deal with it. First I’d read the charred trunk. Based on my test above, I would know that if I gave it a Zone II exposure it would still have tonality. That determines the shadow exposure. Then I’d read the bright rocks. Let’s say they measured 8-1/2 stops brighter than the trunk. That is 3 full stops brighter than what my camera can record. So I now know that AFTER my first shadow exposure, I need to make 5 or 6 more exposures each at ½ or 2/3 faster shutter speed than the exposure before, until the last exposure is at least 3 stops darker than the first. Then it’s time to let Photoshop CS5 and/or other preferred software combine the exposures.
[spacer height=”20px”]
The Bottom Line:
Keep in mind that the Zone System is not dogma! Its application should be considered as something deeply personal. If you simply have a hunch that you like a certain shadow two stops darker than a basic meter reading (Zone V) rather than three, do it that way! It’s really a lot like cooking. If YOU like YOUR veggies al dente, don’t “expose” them to so much heat that they are over done! Bon appétit!
___________________________________________________________________________________________
Do you love taking photographs?
Do you dream of being a better photographer?
Do you have questions about exposure, visualization, Photoshop, or Lightroom?
If your answer is YES, then you’re ready for a totally new way
to learn how to express your photographic vision…
Alan Ross’ Live Virtual Photography Coaching
For People Who Are Passionate About Photography
“Over the years hundreds of people from all over the world have asked me for personal help.
There was just no way I could do it…until now. Today, I’m thrilled to be able to coach
budding photographers from my own studio using the internet!” – Alan Ross
Read student testimonials and find out how to sign up here.
___________________________________________________________________________________________
Upcoming photo expeditions and workshops:
- Ansel Adams’ Yosemite: The Art Of Seeing With Alan Ross (Oct. 2017)
- Exploring Croatia: A Classic & Contemporary Phot0 Adventure on Eastern Europe’s Stunning Dalmation Coast (May 2018)
Marc
Alan