Photographic Visualization
In April 1927, during one of his regular trips to Yosemite, a 25-year-old Ansel Adams trekked up to the ‘diving board’ on the west shoulder of Half Dome. There, he made a dramatic image of the monolith using a mild yellow filter to darken the sky a bit—a generally recommended and accepted practice in those days.
But what Ansel felt about the scene before him was more dramatic than what he knew the yellow filter would give him. With one glass plate left unexposed, he daringly made another exposure, this time using a red filter that he hoped would result in an image that was more in tune with what he imagined, or visualized, the final image should be, instead of what was actually in front of him. That is called photographic visualization.
The image that resulted from this experiment proved to be a turning point for Ansel in his photographic explorations. For the first time, he was conscious of the difference between what his camera lens saw (the literal) and what he saw in his mind’s eye (the expressive) as the final print. He discovered photographic visualization.
Ansel ultimately came to refer to this freedom from recording only what the camera and lens could capture in a technical sense as visualization, and he wrote about it extensively during his lifetime.
By itself, photographic visualization doesn’t assure a successful final image, but it does set the stage for the ensuing choreography of photographic steps. To my way of thinking, it is the single most important element in creating an expressive image.
So…just what IS photographic visualization and how do you visualize a photograph before you shoot?
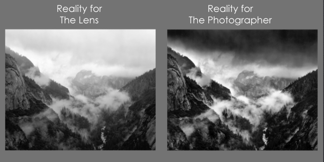
Simply put, photographic visualization is the confluence of imagination and technique. It is the ability to picture the essence of the final print in your mind before releasing the shutter. It’s also possessing the technical know-how to create the image that’s in your mind, even if it differs dramatically from the reality of the scene in front of you.
One of Ansel’s favorite sayings was, “There’s nothing worse than a sharp image of a fuzzy concept.” At the same time, a concept can be sorely limited in clarity by a fuzzy knowledge of technique. The two go hand-in-hand.
In Ansel’s case, his knowledge of technique — knowing what a strong red filter ought to do — enabled him to imagine, or visualize, a final print with a much darker sky than the yellow filter would have afforded. He visualized how he wanted the print to look and used his understanding of technique to realize that vision.
Photo visualization does not, however, require that you see a finished print that is markedly different from the real qualities of the actual scene. It could be as simple as ‘seeing’ a final color image in delicate pastels rather than in bold, vibrant colors and contrasts. It might mean choosing a particular vantage point to emphasize the qualities of a foreground object. But in all cases, visualization dictates the equipment and techniques required to achieve the vision.
Will a longer or shorter exposure enhance motion in a scene? Is it stronger vertically or horizontally? Are there any distracting elements around the edges of your image?
Photographic visualization also includes what we have come to call post-processing. We can visualize making a sky or other element lighter or darker than the meter says it ought to be. We can skew color relationships and local contrasts to strengthen our statement. We can plan for these interpretive and expressive things before releasing the shutter!
These are all things I consider, usually even before I set the camera up.
Now it’s your turn. The next time you’re out photographing, try taking a moment to disconnect from the reality of the scene in front of your lens, and try to visualize a photograph before you shoot.
Here are some steps to follow to help you with photographic visualization before you shoot:
- First think about what attracted you to the scene and caused you to set up your camera. Was it a rock, a feeling about the place (moody, serene, beautiful, scary)?
- Imagine a finished image on your wall. What does it look like? What’s the most prominent feature? Is it soft and delicate? Hard and moody? An abstract?
- Find your vantage point. Sometimes shifting the lens position just an inch can change the dynamic of an image. You’re not ready to decide on a lens yet!
- Choose your lens. If you have more than one lens, now is the time to optimize your image cropping, and that means choosing the best lens. Contrary to a lot of popular writings, the only thing a change in focal length really does is change the cropping! Telephoto “lens compression” and most perceived “wide-angle distortion” are merely manifestations of a change in perspective – the location of the lens relative to the subject. Short focal length lenses do stretch the size of elements at the edges of the field, but this is because the film or sensor is flat! Nothing to do with the lens itself.
- Filter or no filter. If you are working with film or a Leica Monochrome, now is the time to decide if a filter is necessary. With digital imaging, any BW filter effects can be done in post-processing. Polarization and many neutral-density effects need an actual filter.
- Finally, determine exposure! With negative film, it is generally best to make sure that important shadow details are not underexposed. With digital and color transparency film, the opposite is the case: don’t over-expose important highlights!
- Make your photograph, pat yourself on the back and MAKE A PRINT! So many wonderful images never see the light of day, which is a real shame in my view. Why go to all the trouble to make the image if it only ever exists as a negative or pixels on a memory card?
VANTAGE POINT
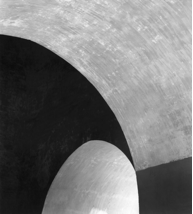
A line of paint on one arch intersects the curve of an opposite arch. A one-inch shift in lens position would have spoiled the effect.
[spacer height=”20px”]
EFFECT OF LENS FOCAL LENGTH
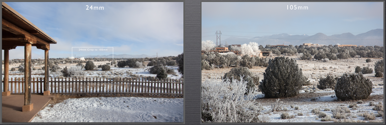
The middle of a 24mm lens capture has EXACTLY the same structure as the full-frame capture with a 105mm lens.
[spacer height=”20px”]EFFECT OF FILTER USE OR POST PROCESSING
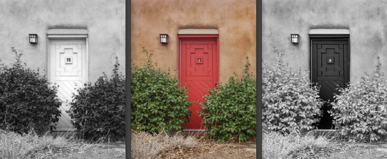
Red filter effect on the left, Green filter effect on the right.
[spacer height=”20px”]
POST PROCESSING VISUALIZATION
A “straight” print on the left, visualized darkroom print on the right
_______________________________________________________________________________________
Do you love taking photographs?
Do you dream of being a better photographer?
Do you have questions about exposure, visualization, Photoshop, or Lightroom?
If your answer is YES, then you’re ready for a totally new way
to learn how to express your photographic vision…
Alan Ross’ Live Virtual Photography Coaching
For People Who Are Passionate About Photography
“Over the years hundreds of people from all over the world have asked me for personal help.
There was just no way I could do it…until now. Today, I’m thrilled to be able to coach
budding photographers from my own studio using the internet!” – Alan Ross
Read student testimonials and find out how to sign up here.
___________________________________________________________________________________________
Upcoming photo expeditions and workshops:
Rohan Gillett
damo