Filters – How to Choose and Use
Part 1
I think the thing I like most about working in black-and-white is the fact that it’s much more an expression of how I feel about a subject than a representation of “reality.” The world doesn’t exist in Black-and-White (my mother told me that…) so a b/w image is by its very nature an abstraction of the things we see.
The judicial use of filters can greatly enhance the impact of how a subject appears, and in black-and-white we can even skew the way colored subjects relate to each other.
I normally like to be fairly subtle about my use of filters; a photograph shouldn’t look like a filter was used, just as a print shouldn’t look like it was dodged and burned! One of the most generally popular choices, a #8 Yellow, is usually so subtle that I don’t see much point in using it. Another popular choice, the #25 Red, is often too strong, rendering skies and day-lit shadows illogically dark.
My two favorite filters, a #12 Yellow (“minus blue”), and a #23 Red, respectively, have both more strength and finesse than the ones found in most camera bags. The #12 yields an effect almost as strong as a #15 orange, but with only a 1 stop filter factor, only slightly greater than the #8. The #23 tends not to make skies quite so artificially dark as the #25.
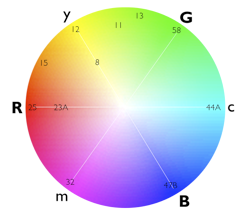
Understanding the relationships of different colors of light to each other is key to choosing a filter. A standard color-wheel is shown below. The numbers in various color areas are Wratten filter-number designations, an industry standard utilized by many filter manufacturers. A #12 filter, for example is pure yellow, a #8 is a light yellow. The capital letters in bold are called Additive Primary colors, and the lower-case letters are Subtractive Primaries.
Red is opposite Cyan
Green is opposite Magenta
Blue is opposite Yellow
In Black-and-White photography the practical effect of a filter is to lighten its own color and darken its opposite color.
In purely scientific terms, a filter has no effect on its own color and darkens everything else, including “neutral” colors. When we apply a “filter factor” to the exposure, neutral colors remain unchanged and then the filter’s own color becomes lighter and its opposite becomes darker.
What we commonly call a “blue” sky is technically a bit more cyan, which is why a red filter will darken the sky more than a yellow filter. Orange is in between. Keep in mind that outdoor shadows are illuminated by the sky, not the white light of the sun. Any filter that darkens the sky will also darken the shadows!
Green or red filters can be quite useful in the Southwest, for example, where we might come across a brilliant green plant in front of a red sandstone wall. With no filter used, the b/w film will see the green and red as being largely the same: gray mush. A strong green filter will make the plant light and the sandstone dark, the red filter will do the opposite.
For workers using digital cameras for b/w, my tests indicate that it is better to use a computer-simulated “filter” after a RAW capture, rather than an actual filter for the capture itself. While this may only approximate the effect of using a filter with film, the effect ought to be similar – without any need for exposure compensation for the filter’s own density.
Polarizing filters are also extremely useful for both B/W and color work – but we’ll cover that in another post!

