I often write about visualization–the difference between what the camera sees (the literal) and what the photographer sees in his or her mind’s eye as the final print (the expressive.) The two may be quite similar or quite different, but being able to interpret what you see and picture the final image on paper is critical to the making of an expressive image because it dictates what techniques and equipment will be required to execute your vision successfully. The first consideration is point of view–how to choose the best spot for camera and lens.
This may seem almost simplistic, but you would be amazed at how many strong, compelling visions are lost in the final image because the photographer didn’t take the time to find the most favorable position.
Why does it matter so much? If you don’t set your camera and lens in the rights spot, you may wind up with elements in your final image that compete with your vision and weaken it. And yes, you can fix some of these things with cropping and Photoshop, but not always, so it really pays to get it right from the beginning.
How To Choose The Best Spot For Camera And Lens
I’ll use a photograph I did not long after I moved to Santa Fe to demonstrate how to choose the best spot for camera and lens – the vantage point. This is a wonderful old adobe about 15 minutes from our house. Interesting to note that shortly after I made this image, the fence and gate were replaced with a tall wall, completely obscuring the building behind. Great example of why, if you see something you’d like to photograph, do it now!
Gate and Windows, Galisteo, New Mexico 1996
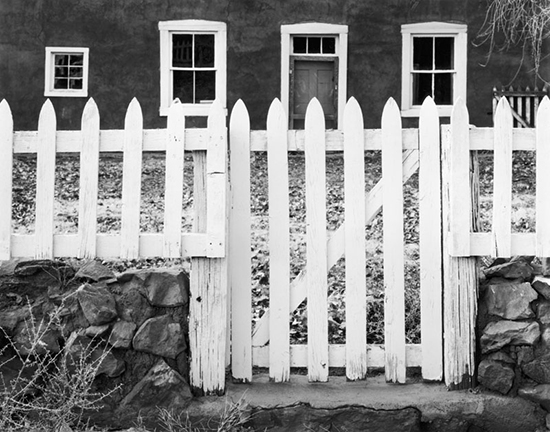
The first thing I did after I decided to photograph this beautiful building was to use my cut-out card with a hole the same shape as my film (see How To Visualize An Image Before You Shoot). This helped me evaluate the various aspects of the scene as elements in a clearly defined structural arrangement.
I also looked through the card with just one eye so that I could see the subject in two dimensions rather than three. And by “cropping out” much of the detail surrounding the scene I wanted to photograph, it was much easier to concentrate on the relationships of the objects within the scene to each other.
Now that I had the basic scene isolated and determined, I had to decide how to choose the best spot for camera and lens. The vantage point includes not only your position with your tripod, but also the exact position of the lens.
I thought about whether I should stand near or far and experimented, again using my cropping card. I moved closer to the scene and noticed that the gate would be larger than I wanted relative to the size of the windows. When I moved back from the scene, the gate was not as prominent as I wanted. I ultimately chose a position that gave me a relationship that felt right.*
The other consideration in choosing a vantage point and setting up the camera is where the lens should be–up, down, left or right? In my image, if I lowered the lens too much, the pickets at the left would run into the little window, and I would see the threshold of the door through the gate. If I raised the lens too high, the pickets merged with the bottoms of the two larger window frames. The left/right position was carefully chosen so that none of the picket points ran directly into any of the architectural features in the background.
Lens & Filter
The choice of a focal length helped refine the exact lens position. I had framed the subject with my hands and knew where I wanted the framed edges to be (cropping). I already knew where I wanted to stand near-far, so choice of lens was simply to pick up the one that gave me the angle of coverage I wanted.
Another consideration was whether to use a filter. In this case, the adobe wall of the house was a deep reddish-brown. I decided to use a strong green filter to darken the wall relative to the white fence and gate.
Bottom line when considering point of view….take your time in setting things up, don’t just happen on the scene and click away. Don’t be afraid to experiment by moving around a bit and seeing what happens when you move in, back, left, right or even up! It doesn’t have to take hours, but paying attention to how to choose the best spot for camera and lens at the beginning will help ensure a better image in the end.
* Note: I mentioned that I chose a position that felt right to me. There are numerous “formulas” for determining compositional structure–the Rule of Thirds, the Golden Sector and others. I have personally never used any of these because I have always felt comfortable with my own sense of “balance.” But if employing one of these time-tested structural aids helps to refine your own seeing, I certainly encourage it.
I’ll leave you with a short quote from Mark Twain in his essay, Fennimore Cooper’s Literary Offenses, “Eschew Surplussage!” In other words, if it doesn’t contribute to your statement, leave it out!
More Photography Tips:
Do you love taking photographs?
Do you dream of being a better photographer?
Do you have questions about exposure, visualization, Photoshop, or Lightroom?
If your answer is YES, then you’re ready for a totally new way
to learn how to express your photographic vision…
Alan Ross’ Live Virtual Photography Coaching
For People Who Are Passionate About Photography
“Over the years hundreds of people from all over the world have asked me for personal help.
There was just no way I could do it…until now. Today, I’m thrilled to be able to coach
budding photographers from my own studio using the internet!” – Alan Ross
Read student testimonials and find out how to sign up here.
_______________________________________________________________________________________
Upcoming photo expeditions and workshops: